Table of Contents
Introduction
Machine learning is a hot topic right now, and rightfully so! It is also something that is very hard to do, if you’re trying to do it right, that is. Since AI/ML is here to stay and not everyone has the time and resources to study every aspect of ML, we need something to help us. We already have TensorFlow which runs in Python, nice if you know Python. But what if you want to experiment with ML in your latest web application? The answer is here: TensorFlow.js!
This blogpost serves as a quick introduction to TensorFlow.js and ML5 so you too can get started with some cool AI/ML examples in your web applications!
Tensorflow

If we are going to implement machine learning into an application, TensorFlow is one of the most used libraries that provides everything we need to get started. It has been around for quite some time and is really mature. It is fully open source and a well-adopted industry standard with great tooling and lots of reference materials.
The full documentation on TensorFlow can be found here. Learning TensorFlow is a long process that requires dedication and a lot of trial and error. Experimentation is key!
There are also a lot of very good online courses to get started with machine learning that can greatly aid you in understanding the key principles and concepts.
There are many more videos about getting started, and there are also some very good courses on online educational websites like Coursera and Pluralsight. They are a great place to start, but always remember that only with extended trial and error and experimentation you will fully grasp the logic behind it all!
TensorFlow.js

Enter TensorFlow.js. This ‘new’ addition to the TensorFlow lineup allows developers to utilize the power of machine learning in the browser or in NodeJS. The biggest advantage of this is that models written in Python can be converted and reused. This allows for some very cool use cases we will go into a bit later.
TensorFlow.js is nice because:
- GPU accelerated (in the browser), thanks to WebGL/OpenCL, and this even on non CUDA cards!
- Lower barrier of entry, no prior Python knowledge required (but can be handy)
- Convert/retrain/reuse existing models with your own data
- Quickly prototype into existing applications without having to setup a full ML pipeline
- In the browser we have direct access to various input devices/sensors like the camera/accelerometer/location/…
This sound almost too good to be true! But there are a few limitations though. Browsers are a lot more memory constrained than when training a model ‘offline’ with Python. This means that super complex models pose an issue when training in the browser, keep this in mind! You can however always train a model offline and only use TensorFlow.js to run the model in the browser and make predictions. Also keep in mind that the models you load, tend to be on the larger side, especially when considering web pages. Some models are upwards of a 100 MegaBytes or more, so loading them can take a while, certainly when bandwidth is limited (mobile devices/3G/bad WiFi).
Taking the TensorFlow.js variant of TensorFlow into account, we can see that there are many options in the ecosystem to build, train and run models almost everywhere.

A small JavaScript example
The following example is one how to recognize digits from the MNIST dataset (Modified National Institute of Standards and Technology). This is a large dataset of scanned handwritten digits. It contains 60,000 training images and 10,000 testing images. Each image is black and white spanning 28 by 28 pixels, for a total of 784 pixels. Numbers you’ll get to know by heart.
All the API calls used are documented on the TensorFlow.js website.
// tf.sequential provides an API where the output from one layer is used as the input to the next layer.
const model = tf.sequential();

// The first layer of the convolutional neural network plays a dual role:
// it is both the input layer of the neural network and a layer that performs the first convolution operation on the input.
model.add(tf.layers.conv2d({
    inputShape: [28, 28, 1],
    kernelSize: 3,
    filters: 16,
    activation: 'relu'
}));

// MaxPooling layer for downsampling => https://www.quora.com/What-is-max-pooling-in-convolutional-neural-networks
model.add(tf.layers.maxPooling2d({
    poolSize: 2,
    strides: 2
}));

// Our third layer is another convolution, this time with 32 filters.
model.add(tf.layers.conv2d({
    kernelSize: 3,
    filters: 32,
    activation: 'relu'
}));

// Max pooling again.
model.add(tf.layers.maxPooling2d({
    poolSize: 2,
    strides: 2
}));

// Add another conv2d layer.
model.add(tf.layers.conv2d({
    kernelSize: 3,
    filters: 32,
    activation: 'relu'
}));

// Now we flatten the output from the 2D filters into a 1D vector to prepare
// it for input into our last layer. This is common practice when feeding
// higher dimensional data to a final classification output layer.
model.add(tf.layers.flatten({}));

 model.add(tf.layers.dense({
    units: 64,
    activation: 'relu'
}));

// Our last layer is a dense layer which has 10 output units, one for each
// We use the softmax function as the activation for the output layer as it
// creates a probability distribution over our 10 classes so their output values sum to 1.
model.add(tf.layers.dense({
    units: 10,
    activation: 'softmax'
}));
This concludes the code for creating the actual layers. Each layer has some comments explaining why it is used and what its function is. As is, this code is not that complex. The complexity stems from knowing what layers to use, what parameters to give them and how to combine them all. This can only be learned up to some degree as a deep understanding is required to figure this out. Thankfully the internet has many websites with resources for machine learning and there are even websites dedicated to providing ready-to-use models, like Model Zoo.
Now we will look at code that sets the optimizer, sets up the training and validation, loads the data and then trains and validates the model. A working example of this code can be found here.
// An optimizer is an iterative method for minimizing a loss function.
// It tries to find the minimum of our loss function with respect to the model's weight parameters.
const optimizer = 'rmsprop';

// We compile our model by specifying an optimizer, a loss function, and a
// list of metrics that we will use for model evaluation. Here we're using a
// categorical crossentropy loss.
model.compile({
    optimizer,
    loss: 'categoricalCrossentropy',
    metrics: ['accuracy'],
});

// Batch size is another important hyperparameter. It defines the number of
// examples we group together, or batch, between updates to the model's
// weights during training.
const batchSize = 320;

// Leave out the last 15% of the training data for validation, to monitor
// overfitting during training.
const validationSplit = 0.15;

let trainBatchCount = 0;
const trainData = data.getTrainData();
const testData = data.getTestData();
const totalNumBatches = Math.ceil(trainData.xs.shape[0] * (1 - validationSplit) / batchSize) * trainEpochs;

// During the long-running fit() call for model training, we include callbacks.
let valAcc;
await model.fit(trainData.xs, trainData.labels, {
    batchSize,
    validationSplit,
    epochs: trainEpochs,
    callbacks: {
        onBatchEnd: async (batch, logs) => {
            trainBatchCount++;
            if (onIteration && batch % 10 === 0) {
                onIteration('onBatchEnd', batch, logs);
            }
            await tf.nextFrame();
        },
        onEpochEnd: async (epoch, logs) => {
            valAcc = logs.val_acc;
            if (onIteration) {
                onIteration('onEpochEnd', epoch, logs);
            }
            await tf.nextFrame();
        }
    }
});


const testResult = model.evaluate(testData.xs, testData.labels);
const testAccPercent = testResult[1].dataSync()[0] * 100;
const finalValAccPercent = valAcc * 100;

const testExamples = 100;
const examples = data.getTestData(testExamples);

// Code wrapped in a tf.tidy() function callback will have their tensors freed
// from GPU memory after execution without having to call dispose().
tf.tidy(() => {
    const output = model.predict(examples.xs);

    // tf.argMax() returns the indices of the maximum values in the tensor along
    // a specific axis. Categorical classification tasks like this one often
    // represent classes as one-hot vectors. One-hot vectors are 1D vectors with
    // one element for each output class. All values in the vector are 0
    // except for one, which has a value of 1 (e.g. [0, 0, 0, 1, 0]).
    const axis = 1;
    const labels = Array.from(examples.labels.argMax(axis).dataSync());
    const predictions = Array.from(output.argMax(axis).dataSync());
});
This is still not all that complicated code, but it is a lot to figure out all by yourself. There are pre-trained models available which can make your life easier, but what if there was an even easier way. What if there exists a library (or more than one) that allows you to do some commonly used machine learning techniques with very little code. It exists, read on below to find out all about it!
ML5

Enter ML5! This library provides ready to use building blocks, as their website describes:
ML5.js aims to make machine learning approachable for a broad audience of artists, creative coders, and students. The library provides access to machine learning algorithms and models in the browser, building on top of TensorFlow.js with no other external dependencies.
This gives us the ability to quickly use these machine learning techniques in prototypes, to experiment with and test viability in real world conditions without requiring a full model to be built up front. This is provided the machine learning technique is available within the ML5 library.
Classifying an image becomes really simple:
// Initialize the Image Classifier method with MobileNet. A callback needs to be passed.
const classifier = ml5.imageClassifier('MobileNet', () => {
    console.log(‘ready’);
});
let img;

function setup() {
    noCanvas();
    img = createImg('images/bird.jpg', () => {
        classifier.predict(img, gotResult);
    });
    img.size(400, 400);
}

function gotResult(err, results) {
    if (err) {
        console.error(err);
    }
    select('#result').html(results[0].className);
    select('#probability').html(nf(results[0].probability, 0, 2));
}
This small example also uses p5.js for image handling/drawing.
It has many different available machine learning techniques available:
- Image classification
- Pose estimation
- Person segmentation
- Biomedical image segmentation
- Style transfer
- Image to image translation
- Feature extraction
- Text sentiment detection
- …
Detailed information and reference documentation can be found on their website. The project is also fully open source and in active development.
Some ML5 examples
We have written some small examples ourselves with ML5. You can run the examples by checking out the repo and switching to any of the solution branches. Be sure to run it from a local webserver or the demos will not work correctly!
The first example uses YOLO (You Only Look Once) and ImageNet to detect the contents of an image and classify it. The second example uses Style transfer to transfer styles from a base image to a provided target image.
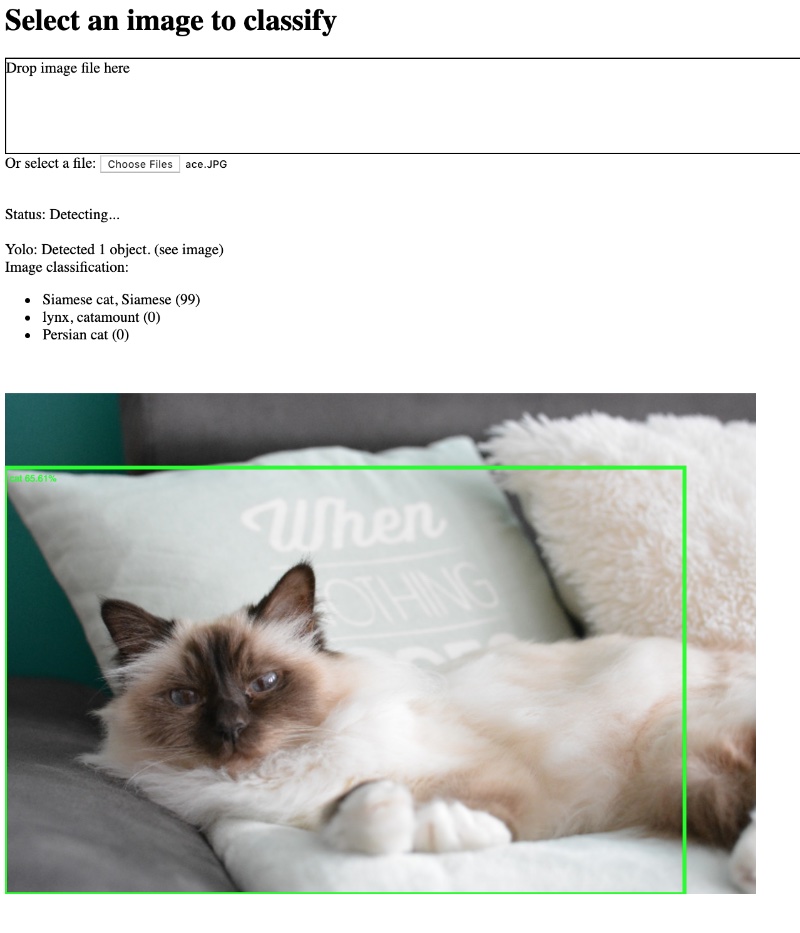

These are really simple to make and provide a real world value for quickly prototyping an application to include a machine learning technique. While not everything is perfect (the cat is a Holy Birman not a Siamese, but I’ll excuse that one) it can give you a rough view on how well it will work and if it merits further development effort.
Be sure to give it a try and see for yourself how easy it really is to get started with TensorFlow in the browser!
Resources


